TAG: Arduino

A low-cost wireless Arduino

A Lilypad with a Sparkfun SMD module and the connection diagram
Some days ago I received my first Lilypad Arduino and started to experiment with a SMD Bluetooth module i bought from Sparkfun. The connection between the BT module and the Arduino board has been described here by Leah Buechley, but instead of using a BlueSmirf Gold Board (which is based upon a Roving Networks module and costs more than 60$) I tried the less expensive Sparkfun SMD module.
From a software point of view, the only difference is the command set when the module is in COMMAND mode.

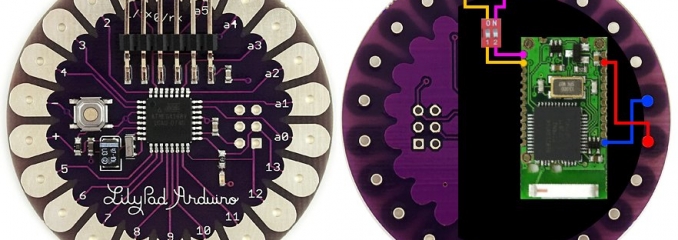
First of all I covered the back side of my Lilypad Arduino with a layer of insulating pvc tape, then, using a small piece of biadhesive tape, I secured the Bluetooth module over the pvc tape.
The connections are quite easy as you may notice from the picture, the only detail that's worth a mention is the small 2 way smd dip switch between the crossed RX/TX connection to Arduino pins, in order to disable the module communication with the ATMega chip when using the USB programmer to load a sketch, since with Lilypad standard bootloader it's not possible to load sketches via Bluetooth.
> Read the full article

Alcoholic MIDI shuffle

The MQ-3 sensor with a shortcircuit between A and H pins and the 200K trimmer
Last night I was working on my sequencer project and, looking at the sensors I recently bought from SparkFun, I had this nasty idea... so i wired up the MQ-3 alcohol sensor, hooked a 200k trimmer to it just to calibrate the range of the measures, and voilà! The sequencer global shuffle can now be controlled using your breath alcohol content...
> Read the full article

Arduino MIDI I/O Board

Schematic
A minimal MIDI input/ouput board ready to be connected to your Arduino! The schematic is very simple, I used a single-copper-hole prototyping board to build mine, but a breadboard is also a nice alternative.
Basic MIDI output is really easy to do with Arduino, all you have to do is initialize the serial port using Serial.begin(31250), then you can send standard MIDI data using Serial.print function.
If you don't want to mess too much with low level MIDI data handling you can just use the MIDI Library developed by François Best, otherwise just read the MIDI protocol specification and start doing your experiments!
> Read the full article

arduinOSC first release

Unfiltered PWM and the filter output (440 Hz sine wave)
arduinOSC is a library which transforms your arduino into a simple arbitrary waveform audio oscillator.
It is based upon the internal 16-bit programmable timer and generates audio using pulse width modulation (PWM) and an external low-pass filter (square waves don't even need the external filter).
I'm using a simple passive low-pass filter, but in the next days I'll try an active low-pass filter based solution.
The library includes a sine wave lookup table (LUT) and a user-definable lookup table which can be found in the file named "user_waveform.h" under arduinOSC folder: if you whish to change this waveform just edit the file and then delete "arduinOSC.o", so the next time you will compile your sketch the library will be rebuilt.
Square waves are generated without a LUT, and in the next version also triangle, ascending sawtooth and descending sawtooth will be generated in this way, so the LUT will be used just for sine and user defined waveforms.
So far the library has been tested with Arduino Nano and Arduino Diecimila with the new ATMega328P.
> Read the full article

High-accuracy 16 bit DAC for Arduino

Analog Devices AD420 serial input 16bit DAC
A 16 bit DAC solution for your Arduino! The schematic is very simple, it's just the DAC (Analog Devices AD420), a few capacitors and an operational amplifier used as voltage follower in order to provide some buffering to the DAC output. The DAC is not very cheap (around 15-18$!) but it allows to obtain a good resolution in order to satisfy all your accuracy needs... I've built the circuit using a smd-to-dil pcb adapter, but the DAC is also available in a breadboard-friendly PDIP package.
> Read the full article

Yet another MIDI-to-Gakken interface!

Gakken SX-150 schematics

A couple of months ago, during Homework Festival I met a guy from Sofia who had a strange machine in his setup... he told me how cheap and funny it was, so I decided to order one on ebay. Last week I received my Gakken SX-150 and started searching around the net for hacks and mods, and I found several projects and articles describing possible ways of interfacing it with MIDI and various external sensors, but, since I was already doing some experiments with a DAC board, I decided to try it with my freshly received Gakken.

> Read the full article

Hacking Maschine - how it all started

The demo setup
I've been a Maschine user for almost two years now, and it's well integrated in my usual setup. Since a few months, though, I've been more and more involved into modular synthesis, and the amount of eurorack modules in my case has been slowly but constantly growing.
I've built oscillators, filters, LFOs, VCAs, a bucket brigade delay unit, yet there was something very important missing: I needed an hardware sequencer!

Of course I was already having fun with a CVPal and my laptop, but somehow it felt weird having to use a mouse to shape my sequences, when all the sounds were created and processed on my modular synthesizer.

Then I decided that it was time to build a simple CV/gate sequencer: I took inspiration from some nice and interesting open source projects (MIDIAlf with CV board and Sonic Potions LXR, to name a couple) and put together some prototypes using breadboards and Arduino.
That was a lot of fun, but... wait a second!  Did I really want to build a dedicated hardware control surface from the ground up? Of course it would have been great and rewarding, but would have required quite some time, and I wanted to be rather focused on the sequencing engine and the software features (well... who knows, if the next Berlin winter is long enough I might also spend time designing some hardware).

Anyways. All of a sudden that Maschine MK2 laying on my desk started to look even sexier... loads of buttons, RGB leds, endless knobs and two 256x64 monochrome displays! But how to use it? No, I wasn' t going to tear it apart and cannibalize some pieces, I had to find a less "intrusive" solution.
What about trying to reverse the communication protocol in order to be able to use the original hardware with a whole new application logic? Maybe even wihout connecting it to a computer? That' s how it all started...
> Read the full article

What happened to maschinIO?

The main menu

It’s been quite some time since my last post, and you might wonder about the status of the library I announced a few months ago… well the bad news is that it’s taking waaaaay longer than I expected, but the good news is that I’m still working on it and most of the hard work has already been done.

So what’s the current status?

  • The graphic library and the display abstraction layer have been completed and tested on Maschine MK1, Maschine Mikro MK2 and Maschine MK2 (I still have to test it on Maschine Mikro MK1 though…)
  • The Windows/Mac/Linux usb communication layer is 100% working
  • The SAM3X communication layer is currently being implemented
  • I already started to write some demo applications (as you can see in the video below)

> Read the full article

Synapse - A DIY-friendly CV I/O shield for Arduino

Some Synapse pcbs

Synapse is a simple, diy-friendly Arduino shield that will allow you to expand your modular synthesizer in new and creative ways. Here's the hardware features:

  • 2 x control voltage inputs, 0 to 5V with diode protection
  • 2 x control voltage outputs, individually configurable as 0 to 10V or -5 to 5V via software, with 12bit of resolution
  • 2 x gate inputs
  • 2 x gate outputs
  • 1 x eurorack power connector (10 pin)

Please refer to the github repository for the latest version of the schematic, the BOM and the library. Please note that for the time being I'm not selling kits or pcbs, you'll have to order the pcbs yourself and source all the parts (see the links and infos below).

> Read the full article